AI Development in WSL: GPU, CUDA, Model Caches, and File IO
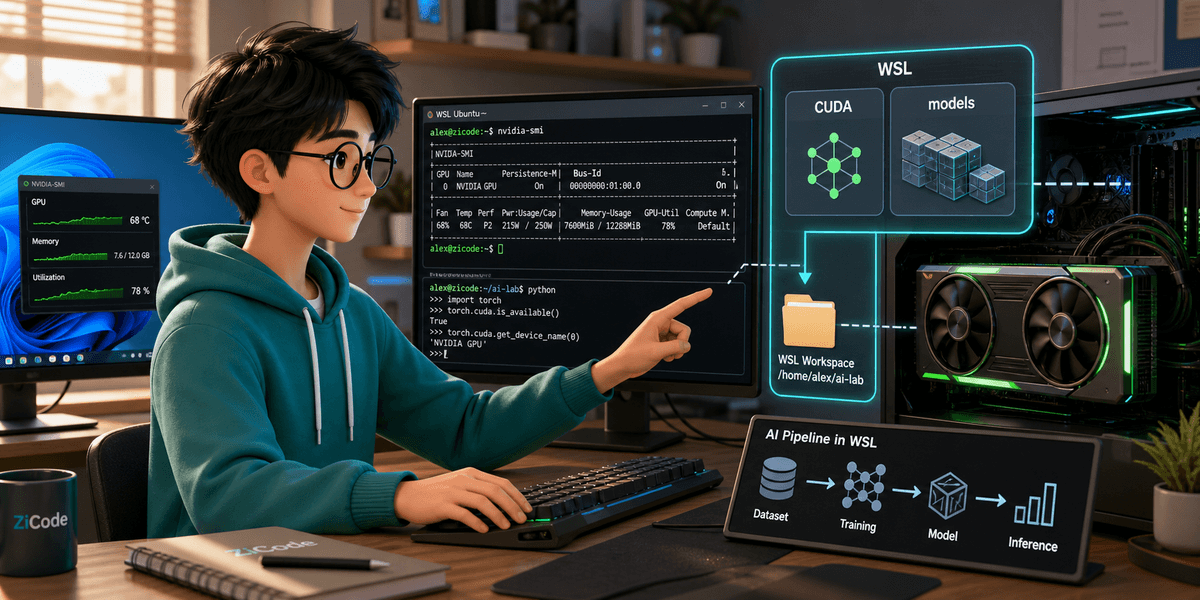
The best part of doing AI development in WSL is that you can use the Linux ecosystem: Python, CUDA, PyTorch, vector libraries, build tools, and local model services, without leaving the Windows desktop. The most uncomfortable part is almost the same thing: the GPU driver lives on Windows, CUDA is exposed inside WSL, model caches may live in Linux or on a Windows drive, and Docker may add another layer.
Many “the GPU is not working” problems are not model problems. They are boundary problems.
This article does not try to install every AI framework. It follows one reproducible path: verify that an NVIDIA GPU is visible inside WSL, run a minimal PyTorch test, start a local model service, and then make the model cache, Docker, and file IO boundaries explicit.
First, Confirm That the GPU Comes from the Windows Driver
NVIDIA CUDA inside WSL is not PCIe passthrough in the traditional virtual machine sense. You should not install the full Linux NVIDIA display driver inside Ubuntu. The correct path is: install an NVIDIA driver on Windows that supports WSL, then use the CUDA interface exposed into WSL.
Microsoft’s documentation is clear about the first step: install an NVIDIA CUDA-enabled driver for WSL on the Windows side. NVIDIA’s CUDA on WSL guide also describes this workflow as running CUDA applications and containers inside WSL2.
Inside WSL, start with:
nvidia-smiIf you can see the GPU, driver version, and memory usage, the basic bridge is working.
If the command is missing or fails, do not immediately install random drivers inside Ubuntu. Go back to Windows and check:
nvidia-smi
wsl --version
wsl --update
wsl --shutdown
Then enter WSL again.
I usually write the first layer of checks as a tiny script:
cat > check-wsl-gpu.sh <<'SH'
set -e
echo "== WSL =="
uname -a
echo
echo "== NVIDIA =="
nvidia-smi
echo
echo "== CUDA libraries =="
ls -l /usr/lib/wsl/lib/libcuda.so* 2>/dev/null || true
SH

bash check-wsl-gpu.sh
This script does not fix anything. It answers one question: can WSL see the GPU capability exposed by the Windows driver?
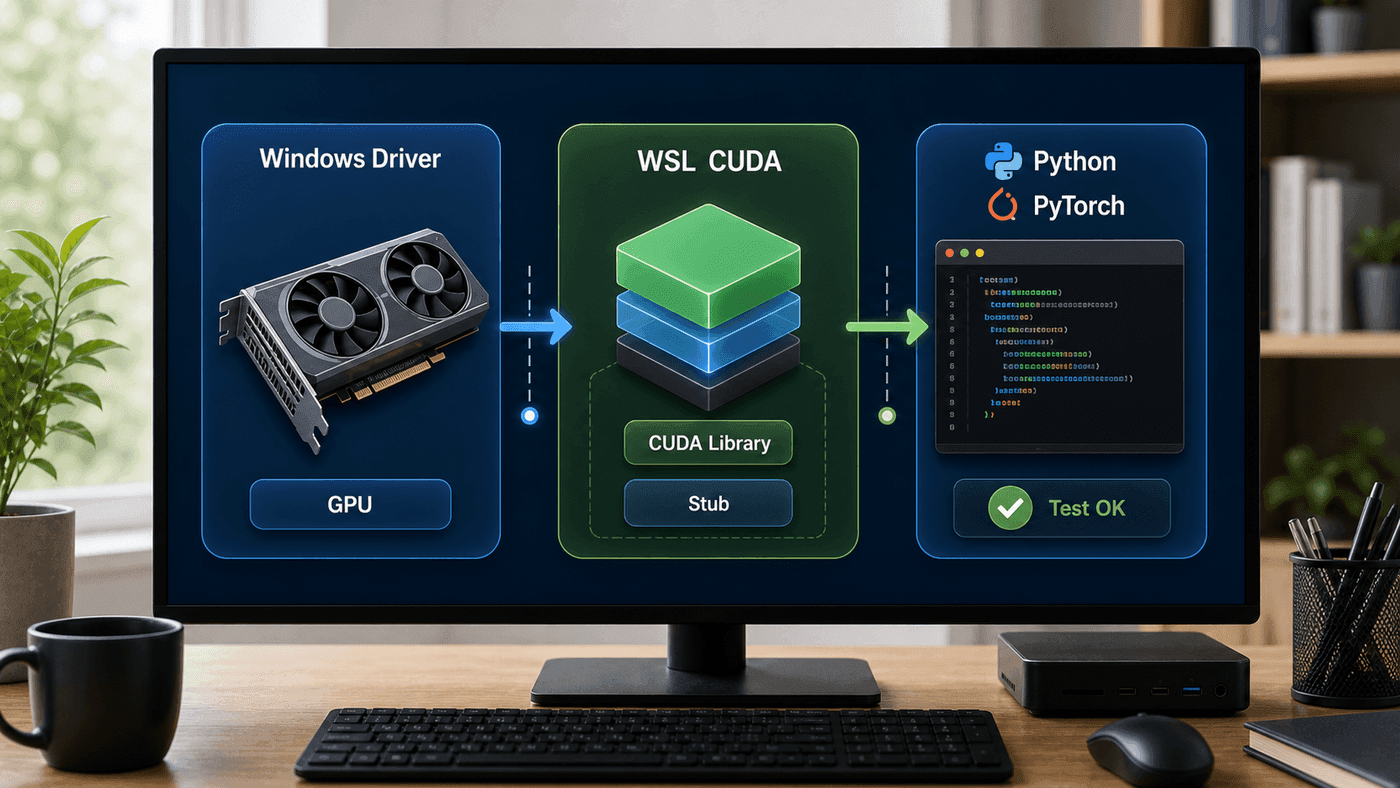
The middle layer is the easiest one to misunderstand. The fact that WSL can run CUDA does not mean Ubuntu needs the full display driver. It depends on the Windows driver, the CUDA libraries visible inside WSL, and whether the framework version can connect to them.
Do Not Start Debugging with a Large Model
Many people start by running a local LLM. When it fails, the log scrolls for pages, and it becomes difficult to tell whether the problem is CUDA, dependencies, or the model itself. Start with a minimal PyTorch test.
Use a clean environment:
mkdir -p ~/work/wsl-gpu-check
cd ~/work/wsl-gpu-check
python3 -m venv .venv
source .venv/bin/activate
python -m pip install --upgrade pip
Install PyTorch from the official selector for your CUDA version. Do not blindly copy a fixed command here, because PyTorch installation indexes and supported CUDA versions change. After installation, run:
import torch

print("torch:", torch.__version__)
print("cuda available:", torch.cuda.is_available())
print("device count:", torch.cuda.device_count())

if torch.cuda.is_available():
    print("device:", torch.cuda.get_device_name(0))
    x = torch.randn(4096, 4096, device="cuda")
    y = x @ x
    torch.cuda.synchronize()
    print(float(y[0, 0]))
Save it as check_torch_cuda.py:
python check_torch_cuda.pyOpen another WSL window at the same time:
watch -n 0.5 nvidia-smiIf torch.cuda.is_available() is True, and nvidia-smi briefly shows a Python process using GPU memory, the PyTorch layer is basically correct. Only then is it worth moving on to models.
Model Cache Placement Matters More Than It Looks
In AI development, model files are often much larger than code. A quantized 7B model can be several gigabytes. A multimodal model can be much larger. Hugging Face caches, Ollama models, vector indexes, and datasets can fill a disk quickly.
I do not recommend putting model caches under /mnt/c/Users/... and reading them from WSL. The reason is the same as with source code: high-frequency reads, large-file mmap, small tokenizer configs, and index files repeatedly cross the Windows/WSL boundary.
A steadier layout is to keep projects and model caches inside the WSL filesystem:
mkdir -p ~/models
mkdir -p ~/datasets
mkdir -p ~/work/ai-lab
For Hugging Face:
export HF_HOME="$HOME/models/huggingface"
export TRANSFORMERS_CACHE="$HF_HOME/transformers"
export HF_DATASETS_CACHE="$HOME/datasets/huggingface"
Before writing these into ~/.bashrc or a project .envrc, make sure the team convention is clear. Once model caches are scattered across multiple paths, cleanup becomes painful.
Ollama can run on both Windows and WSL. The Windows version runs as a native Windows application, and the API defaults to http://localhost:11434. If you mostly use models from Windows desktop apps, the Windows version is simpler. If your scripts, evaluation tools, and data processing all live in WSL, running Ollama inside WSL also makes sense.
The important thing is not to run two separate installations while pretending they share one model directory. The model directory should have one clear owner.
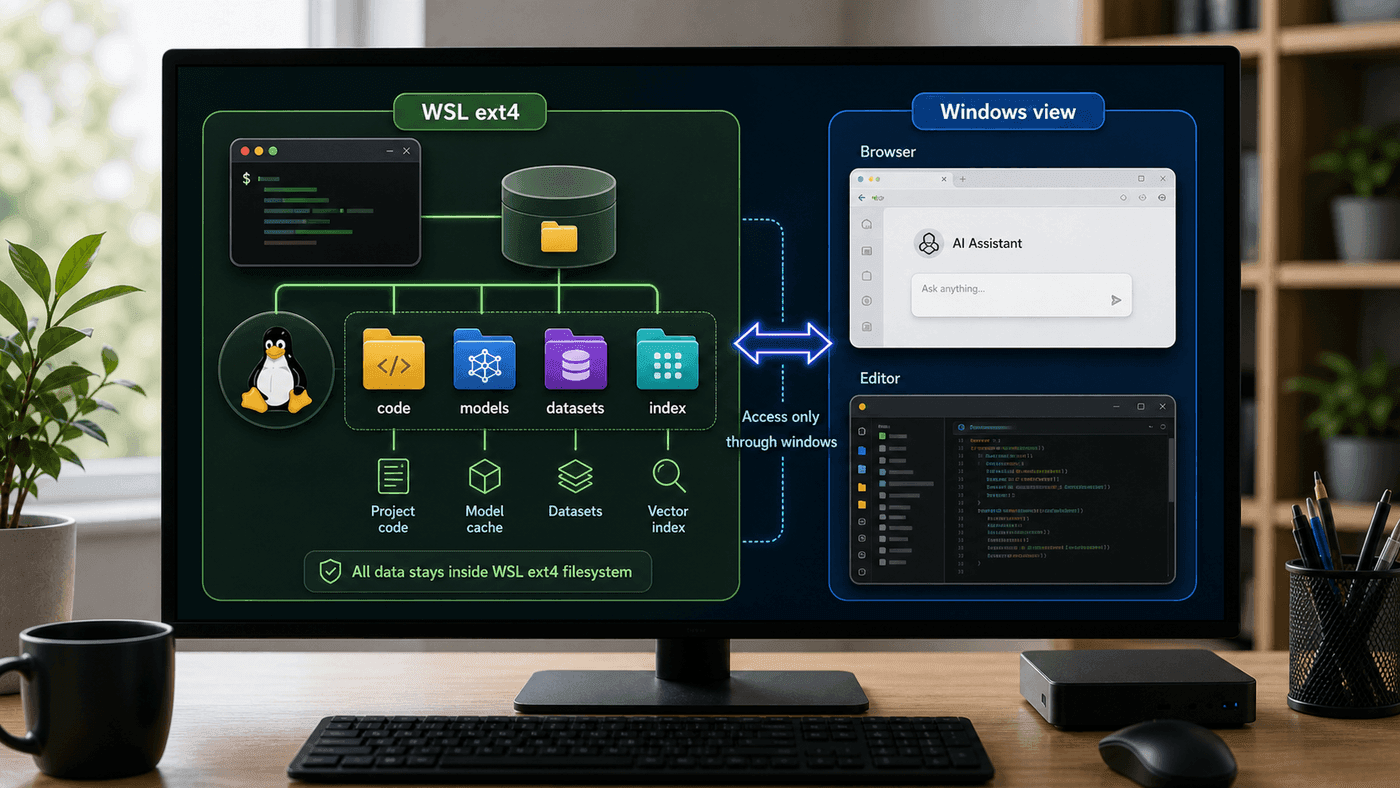
My habit is to give large files a clear “home”: code, models, datasets, and vector indexes stay in WSL’s ext4 filesystem. Windows handles the editor, browser, and desktop interactions, but it does not serve high-frequency small-file reads.
For Local Model Services, Check the API and GPU Memory
Suppose you run Ollama inside WSL:
curl -fsSL https://ollama.com/install.sh | sh
ollama serve
In another window:
ollama pull qwen2.5:7b
ollama run qwen2.5:7b "Explain WSL in one sentence."
Do not build a complicated agent yet. Test three things first:
curl http://localhost:11434/api/tagsConfirm that the API responds.
nvidia-smiConfirm that GPU memory changes when the model runs.
du -sh ~/.ollama 2>/dev/null || trueConfirm where the model files are stored.
If Windows programs also need to access Ollama inside WSL, check the current networking mode. Under NAT mode, Windows can often reach WSL services through localhost; mirrored mode makes localhost behavior more direct. But the service itself still needs to listen on the right address. Some services bind only to 127.0.0.1 by default; others can be configured with OLLAMA_HOST=0.0.0.0:11434.
Be deliberate about the security boundary. If a local model API listens on 0.0.0.0, it may be reachable not only from Windows but also from the local network. Do not expose a model service broadly just for convenience.
GPU in Docker Adds One More Layer
Local AI development often uses Docker. WSL + Docker + GPU can work, but troubleshooting must be layered.
First confirm that the WSL host can see the GPU:
nvidia-smiThen confirm that a container can see the GPU. Docker Desktop and NVIDIA Container Toolkit support changes over time, so check current official documentation. A common test looks like this:
docker run --rm --gpus all nvidia/cuda:12.4.1-base-ubuntu22.04 nvidia-smiIf the host can see the GPU but the container cannot, the problem is Docker GPU runtime, not PyTorch.
If the container can see the GPU but PyTorch cannot, inspect CUDA and PyTorch versions inside the image.
If PyTorch can see the GPU but the model still runs on CPU, inspect the framework’s loading parameters. Some libraries require explicit settings such as:
device_map="cuda"or:
model.to("cuda")Do not flatten every problem into “WSL is misconfigured.” WSL is only the first layer.
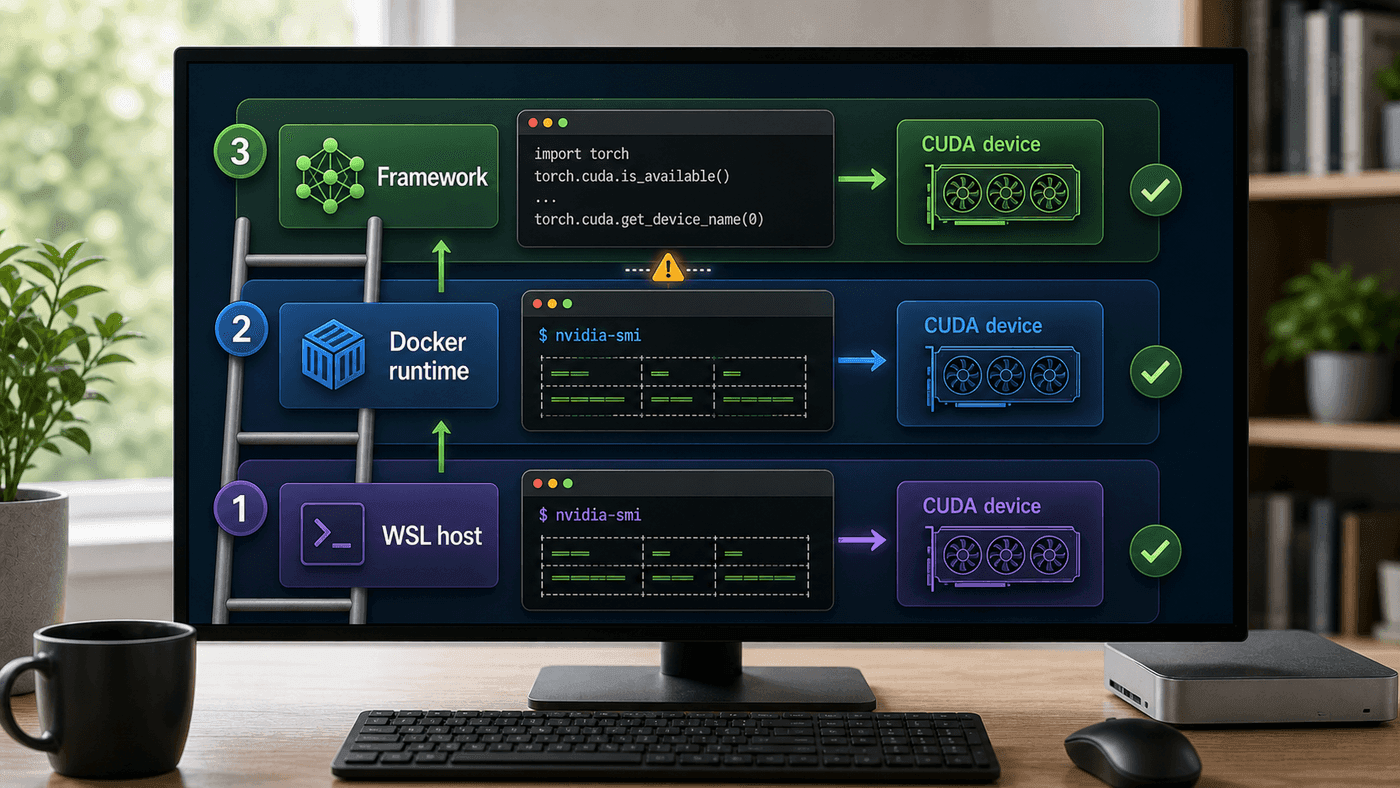
Troubleshoot upward through these layers: host nvidia-smi, container nvidia-smi, framework torch.cuda.is_available(). Fix the layer that breaks. Do not reinstall the whole stack first.
File IO: Inference and Training Are Different
During inference, disk access is heavy during model loading, and runtime is mostly about GPU memory and RAM. During training or fine-tuning, data loading continuously affects performance.
If your dataset is under /mnt/d/datasets and the training script runs inside WSL, it will continuously read across the boundary. Image datasets, small parquet files, tokenized shards, and similar layouts amplify the cost.
I would arrange files like this:
~/work/ai-lab/          # code
~/models/               # model weights
~/datasets/             # training/evaluation data
~/runs/                 # experiment outputs
/mnt/d/archive/          # cold archive, not directly read during training
Before training, sync a copy from a Windows drive or external disk into WSL:
rsync -av --info=progress2 /mnt/d/datasets/my-set/ ~/datasets/my-set/After the experiment, archive the result out:
rsync -av ~/runs/exp-2026-06-21/ /mnt/d/archive/ai-runs/exp-2026-06-21/Do not make every training step read from a Windows partition.
When GPU Memory Is Tight, Reduce the Problem First
WSL will not create more VRAM. An 8 GB GPU has 8 GB of VRAM. Your levers are quantization, offload, batch size, context length, and model size.
Start by collecting:
nvidia-smi
free -h
df -h
Then inspect model parameters:
- model size;
- quantization format;
- context length;
- batch size;
- whether KV cache is enabled;
- whether CPU/GPU mixed offload is used;
- whether a browser, game, video meeting, or another model service is also running.
The Windows desktop also uses the GPU. What you see in WSL through nvidia-smi is not a GPU dedicated to Linux. It is shared with Windows. Hardware-accelerated browsers, meetings, and another inference service can all reduce available memory.
My Minimal Self-check
Put these commands in the project README:
# 1. WSL can see the GPU
nvidia-smi

# 2. Python can see CUDA
python - <<'PY'
import torch
print(torch.__version__)
print(torch.cuda.is_available())
print(torch.cuda.get_device_name(0) if torch.cuda.is_available() else "cpu")
PY

# 3. Model cache path
echo "HF_HOME=$HF_HOME"
du -sh "$HF_HOME" 2>/dev/null || true

# 4. Local model API
curl -s http://localhost:11434/api/tags | head

# 5. File location
pwd
df -T .
This covers five layers: driver, framework, model cache, service API, and filesystem. Once this is documented, new teammates do not have to guess between CUDA version, WSL version, model paths, and service setup.
How I Choose Between Native Windows and WSL
For chatting with models or trying a few prompts, native Windows Ollama is simpler. It installs a background service and Windows programs can access it naturally.
For Python scripts, evaluation, vector indexes, compiled dependencies, and Linux toolchains, I prefer WSL. Code, models, and data stay in the WSL filesystem. Windows handles the browser, editor, communication tools, and occasional file viewing.
For production, I do not assume that “it works in local WSL” means it will behave the same on a Linux server. WSL is an excellent development environment, but its GPU, filesystem, networking, systemd, and Docker layers have their own boundaries. Before deployment, verify the complete workflow in the target Linux environment.
References
- Enable NVIDIA CUDA on WSL 2 - Microsoft Learn
- Get started with GPU acceleration for ML in WSL - Microsoft Learn
- CUDA on WSL User Guide - NVIDIA Documentation
- CUDA on Windows Subsystem for Linux - NVIDIA Developer
- Ollama hardware support
- Ollama on Windows
Follow ZiCode on WeChat
If this post was useful, you can follow later updates on WeChat as well.

X / Twitter
Follow @ax2_zicode
Faster technical notes, short thoughts, and new-post alerts are posted on X.